Hive Integration
You can integrate Hive with external applications and platforms using REST API tokens and webhooks.
Chat GPT
You can improve your project description using Chat GPT. This option is available for Markdown fields in Issue details and for Wiki pages.
Configuration
First you need to add Chat GPT token to the configuration file:
- Open the console of the virtual machine;
- Open the file
/opt/hw-bw/config/user.ini(root privileges required); Add the
b.engine.openai.tokenoption to the main section and add the token value:[main] b.engine.openai.token = <token value>To apply changes, run the command:
/opt/hw-bw/bin/reconfig
After that you can start using Chat GPT for text generation.
How to use
Select the entered text and click on Chat GPT icon.
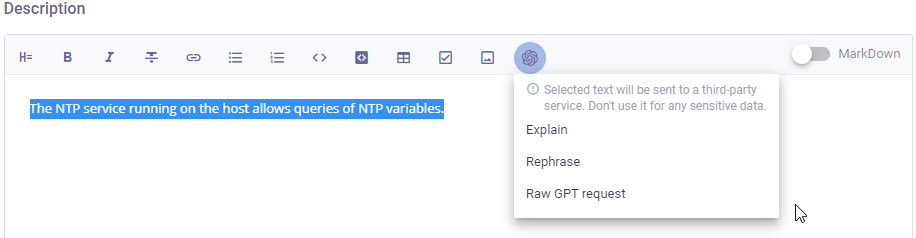
You can choose from the following request types:
Explain - the detailed explanation of the selected text,
Rephrase - rephrases/improves the entered text,
Raw GPT request - you can enter and send the request to Chat GPT.
When text is generated, you can:
- Apply the text
- Discard the request
- Try again - the system will resend the same request
NOTE: Anything written using the GPT chat can become public.
Additional settings
Some parameters have default values, that can be changed using /opt/hw-bw/config/user.ini file.
- Open the console of the virtual machine;
- Open the
/opt/hw-bw/config/user.inifile, e.g.:
sudo nano /opt/hw-bw/config/user.ini
- Add the following parameters to the
[main]section of the file:
b.engine.openai.model = <chat gpt model>.default value = gpt-3.5-turbo
b.engine.openai.template.explain = <prepromt> {message}.default value = Act as a cybersecurity expert. Shortly explain: '{message}'
b.engine.openai.template.rephrase = <prepromt> {message}.default value = Act as a cybersecurity expert. Rephrase:'{message}'
- Save the
/opt/hw-bw/config/user.inifile - Apply the changes by running the command:
/opt/hw-bw/bin/reconfig
The full list of available parameters can be found in /opt/hw-bw/config/user-template.ini.
HashiCorp Vault
HashiCorp Vault is a secrets management tool specifically designed to control access to sensitive credentials. It can be used to store sensitive values and at the same time dynamically generate access for specific services/applications on lease.
After you complete the Vault integration with Hive, you will be able to connect Hive with AD/LDAP by specifying not the plain password for the service account, but the path in Vault, where this password is stored.
If you already have HashiCorp Vault installed in your company, proceed with Hive configuration.
If you don't have the Vault previously configured, you can use the following steps to prepare it for the integration with Hive.
Vault configuration
- Open the console of the machine, where Hive is installed.
Set environment variables to be able to connect to Vault by running the commands:
export VAULT_ADDR=<VAULT_URL>
export VAULT_TOKEN=<VAULT_TOKEN>
where
VAULT_ADDR- URL of the Vault server,VAULT_TOKEN- token, used to access the Vault.
More info about these parameters can be found here.
Enable a key-value secret engine v1 or/and v2:
vault secrets enable -path=<kv mount point> kv
vault secrets enable -path=<kv mount point> -version=2 kv
Example:
vault secrets enable -path=test_point -version=2 kv
<kv mount point>can take any value, e.g.-path=test_point.
You can also remove-pathparameter. In this case it will take the default value -kv
Set the vault policy by creating an
.hclfile and adding the following setting into it:path "<kv mount point>/*" { capabilities = ["read"] }where
<kv mount point>is the path you've created in step 3.Example:
cat > test.hcl

path "test_point/*" {
capabilities = ["read"]
}
Apply the created policy by running the command:
vault policy write <policy_name> './<file_name>.hcl'Example:
vault policy write test_readonly './test.hcl'Enable and create the approle:
vault auth enable -path=<approle mount point> approle
vault write auth/<approle mount point>/role/<vault-approle> token_policies=<policy_name>
where
approle mount point- name of the approle mount point (you can set any value; will be used asVAULT.AUTH.MOUNT_POINTin Hive configurationvault-approle- name of the approle itself (name of the application, for which this role is created, is usually used)policy_name- name of the policy created in step 4.
Example:
vault auth enable -path=test_approle approle

vault write auth/test_approle/role/hive_approle token_policies="test_readonly"
Read approle id. This value will be used as
VAULT_ROLE_IDvariable in Hive configuration:vault read auth/<approle_mount_point>/role/<vault-approle>/role-idExample:
vault read auth/test_approle/role/hive_approle/role-idRead unwrapped secret id:
vault write -f auth/<approle_mount_point>/role/<vault-approle>/secret-idExample:
vault write -f auth/test_approle/role/hive_approle/secret-idWrite the
secret-idvalue in a.txtfile and make note of the full path to this file.
It will be used forVAULT.SECRET_ID.UNWRAPPED.FILE_PATHproperty in Hive configuration.Read wrapped secret id:
vault write -wrap-ttl=<time_in_sec> -force auth/<approle_mount_point>/role/<vault-approle>/secret-idwhere
wrap-ttl- timeframe in seconds, during which the token is valid.Example:
vault write -wrap-ttl=360s -force auth/test_approle/role/hive_approle/secret-idWrite the
wrapping tokenvalue in a.txtfile and make note of the full path to this file.
It will be used forVAULT.SECRET_ID.WRAPPED.FILE_PATHproperty in Hive configuration.
Now you can proceed with Hive configuration.
Hive configuration
Pre-requisites:
- JQ tool is installed on the Hive server.
The password for LDAP admin account is saved as a secret in Vault as described here or via GUI.
If you are adding the secret via CLI, make note of the path and the name of the key you created.
These parameters will be used as
pathandkeyvalues accordingly, when the service password for LDAP connection is set up.
To initiate the connection, you need to do the following:
- Open the console of the machine, where Hive is installed.
- Open the file
/opt/hw-bw/config/user.inifor editing (root privileges required). - The following parameters should be added, depending on the secret type (wrapped or unwrapped) and the connection type (http or https):
| Field name | Description |
|---|---|
vault.address |
The vault server address. Required field. |
vault.role_id.value |
The value of the AppRole ID. Required field. |
vault.secret_id.wrapped.file_path |
Path to the file with wrapping token. Required field if wrapped SecretID is used. |
vault.secret_id.unwrapped.file_path |
Path to the file with unwrapped SecretID. Required field. |
vault.secret_id.unwrap.engine_type |
Name of the engine used to unwrap SecretID. Required if wrapped SecretID is used. |
vault.secret_id.unwrap.field |
Name of the field, where the unwrapped SecretID will be stored. Required, if kv-v1, kv-v2 engines are used.For approle engine secret_id field is used by default. |
vault.secret_id.unwrap.cacert |
Path to the specific certificate used for https connection. If not set, OS root certificates are used. |
vault.secret_id.unwrap.capath |
Path to the directory with certificates used for https connection. If not set, OS root certificates are used. |
vault.auth.mount_point |
The fully-qualified login path. Can be set as one word, e.g. test_approle or as a path, e.g. my/dep/test_approle (depending on your Vault configuration) |
vault.sensdata.encrypt.key_path |
Path to the encryption key, stored in the Vault. Can be used in the environment, where password encryption is enabled (see article). If not set, the value from SENSDATA_ENCRYPT_KEY is used.If path is incorret, the system will throw an error. Accepts the following parameters: engine=<engine_type>,mount_point=<kv_mount_point>,path=<secret_path>,key=<secret_key> |
Below you can find the examples of the configuration:
if the secret is wrapped:
vault.address = https://my-vault.example.com:8200
vault.auth.mount_point = test_approle
vault.role_id.value = 55cdf32b-498a-c989-a18f-ef3b4aa0eece
vault.secret_id.unwrapped.file_path = /opt/vault_secret/unwrapped.txt
vault.secret_id.wrapped.file_path = opt/vault_secret/wrapped.txt
vault.secret_id.unwrap.engine_type = approle
if the secret is unwrapped:
vault.address = https://my-vault.example.com:8200
vault.auth.mount_point = test_approle
vault.role_id.value = 55cdf32b-498a-c989-a18f-ef3b4aa0eece
vault.secret_id.unwrapped.file_path = /opt/vault_secret/unwrapped.txt
Save the
/opt/hw-bw/config/user.inifile.You can check if the values are correct and applied properly by running the command:
sudo /opt/hw-bw/bin/vault check-configTo apply changes, run the command:
/opt/hw-bw/bin/reconfigIf you're using unwrapped secret id, proceed with the unwrap process.
It can be done manually or with your automation tools, using the command:sudo /opt/hw-bw/bin/vault unwrapThe process is also executed automatically every time the application restarts.
After that, you can connect Hive with LDAP using Vault Secret ID.
Go to Administration > LDAP and replace the service password with the path to the secret ID:
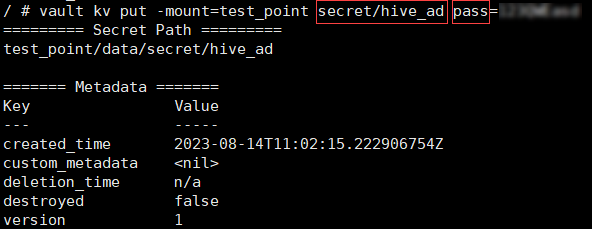
engine=<engine_type>,mount_point=<kv mount point>,path=<secret_path>,key=<secret_name>, e.g.:engine=kv-v2,mount_point=test_point,path=secret/hive_ad,key=pass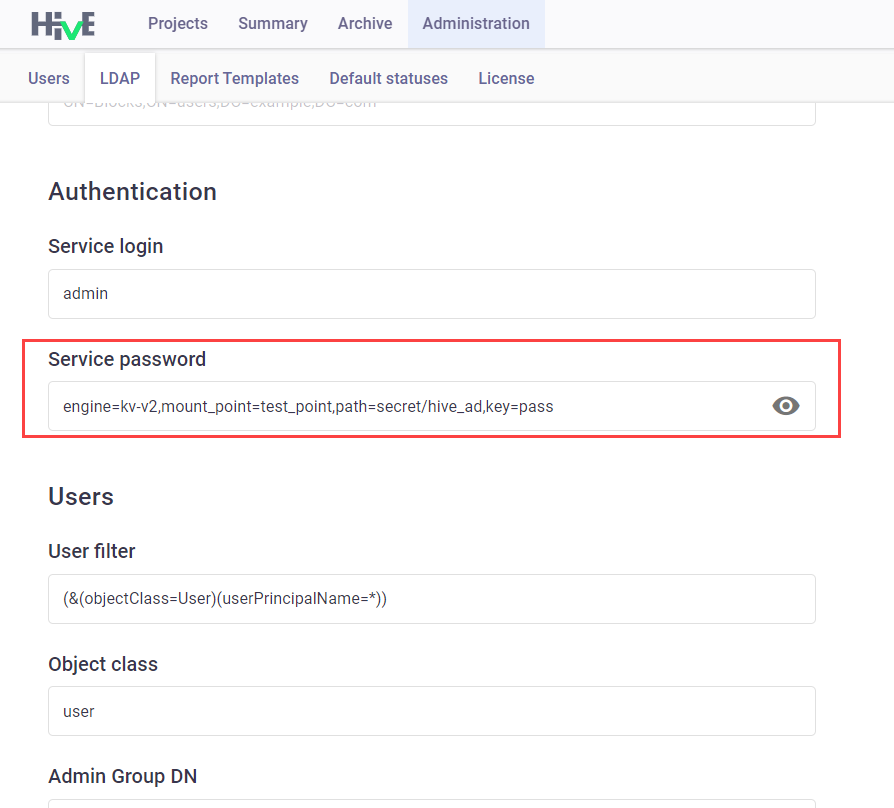
where:
engine- the type of the engine used in your Vault.kv-v1andkv-v2are currently supported.mount_point- path to the vault secret engine. Equals to<kv mount point>set in step 3, Vault configuration.path- path to the secret in Vault.key- name of the secret in Vault.
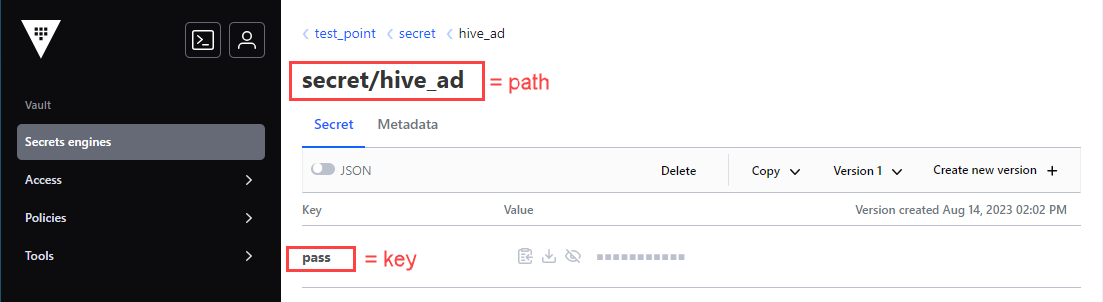
You can takepathandkeyvalues from the Vault GUI:
To make sure that all fields are correct, click Test Connection.
If the connection is successful, you should be able to see the list of users from AD.
After that, you can Save the configuration.
Now the authorization in LDAP will be executed via Vault.